The Art of Placement: Mastering Correct Art Proportion for a Room
Have you ever walked into a room and felt like something was just…off? Perhaps the furniture was beautiful, the colors harmonious, but something felt amiss. Often, the culprit is improperly sized art. A too-small piece can get lost on a vast wall, while an oversized artwork can overwhelm a space, making it feel cramped and unbalanced. Choosing the correct art proportion for a room is crucial to creating a visually appealing and harmonious environment.
Why Art Proportion Matters
Beyond mere aesthetics, the proportion of art in a room significantly impacts the overall feel and atmosphere. Think of it as the silent language of design. Proportion helps to:
- Create Balance: Well-proportioned art anchors a space, providing a focal point without overpowering the other elements.
- Enhance Harmony: When art is appropriately sized, it complements the surrounding furniture and décor, creating a cohesive and pleasing visual experience.
- Define Scale: The size of the artwork influences our perception of the room’s size. A large piece can make a small room feel even smaller, while a well-chosen piece can visually expand a space.
- Evoke Emotion: Proportion plays a subtle role in how we feel in a space. A grand, oversized artwork can evoke awe and drama, while a smaller, more intimate piece creates a sense of calm and contemplation.
General Guidelines for Art Size and Placement
While personal taste reigns supreme, some general guidelines can help you navigate the often-confusing world of art sizing. These aren’t rigid rules, but rather starting points to guide your eye.
The Wall Coverage Rule
A common principle is the wall coverage rule, which suggests that artwork should cover approximately two-thirds to three-quarters of the available wall space. This applies whether you’re hanging a single piece or creating a gallery wall.
Here’s how to apply it:
- Measure the Wall: Determine the width and height of the wall where you plan to hang the art.
- Calculate the Ideal Coverage: Multiply the wall’s width by 0.66 (two-thirds) and 0.75 (three-quarters). This range represents the ideal width of the artwork or grouping. Do the same for the height if you’re considering a vertical piece or stack.
- Consider the Furniture: If you’re hanging art above a sofa, console table, or other furniture, factor that into the calculation. The artwork should be approximately two-thirds to three-quarters the width of the furniture below.
Example: Let’s say you have a wall that is 10 feet (120 inches) wide.
- Two-thirds coverage: 120 inches x 0.66 = 79.2 inches
- Three-quarters coverage: 120 inches x 0.75 = 90 inches
Therefore, your artwork should ideally be between 79.2 and 90 inches wide.
The Eye-Level Rule
Another important factor is the height at which you hang your art. The general rule of thumb is to hang the center of the artwork at eye level, which is typically around 57 to 60 inches from the floor. This ensures that the art is easily viewable and creates a comfortable viewing experience.
Here’s how to apply the eye-level rule:
- Measure the Artwork: Determine the height of your artwork.
- Find the Center Point: Divide the height of the artwork by two to find the vertical center point.
- Calculate the Hanging Height: Subtract the distance from the top of the frame to the hanging hardware from the center point you calculated in step 2. Then measure 57-60 inches up from the floor and mark that spot. This is where the hanging hardware should be placed.
Art Proportion in Different Rooms
The ideal art size and placement can vary depending on the room and its function. Here’s a breakdown for some common spaces:
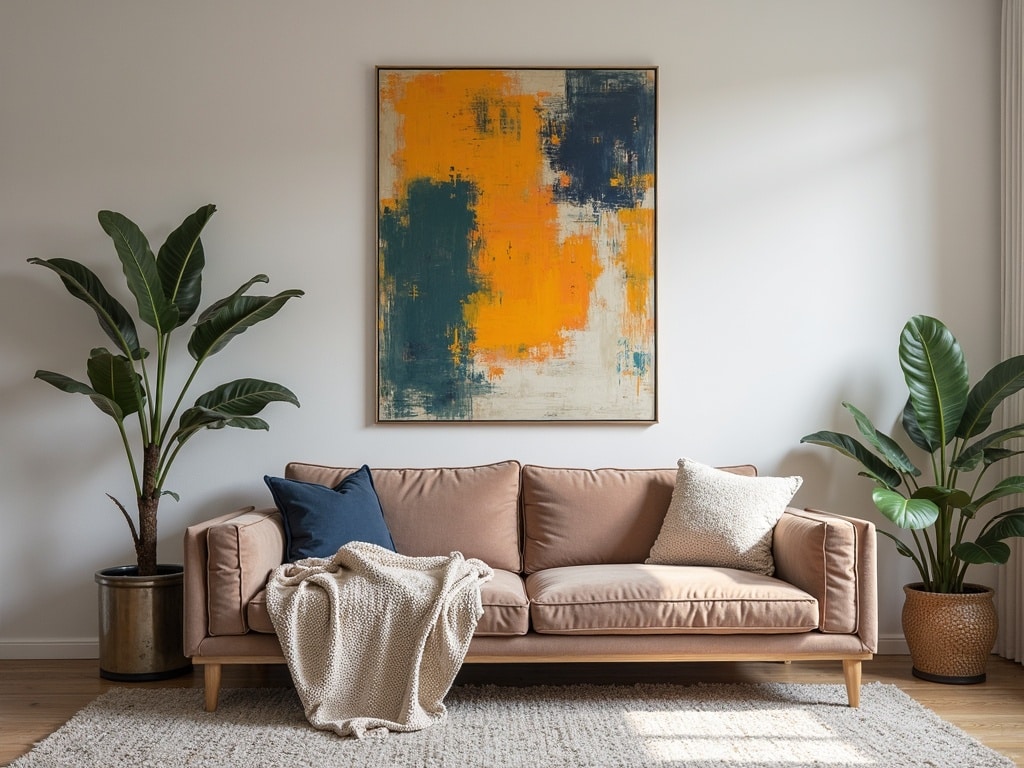
Living Room
The living room is often the largest space in the home, making it a prime candidate for larger artwork. Consider a statement piece above the sofa or fireplace to create a focal point. In a living room, balance is key. Make sure the size of the artwork complements the scale of the furniture and the overall dimensions of the room. With high ceilings, consider vertical pieces to draw the eye upwards. Always remember to give the artwork some breathing room on the wall. Avoid cramming large pieces into small spaces.
Bedroom
In the bedroom, aim for a more serene and calming atmosphere. Smaller, more intimate pieces often work best. Above the bed is a popular spot for art, but make sure the width of the artwork is less than the width of the headboard to avoid overwhelming the space. Symmetrical arrangements can create a sense of balance and tranquility.
Dining Room
The dining room is a great place to showcase artwork that stimulates conversation and adds visual interest. A horizontal piece above a buffet or console can create a sense of spaciousness. Consider the style of your dining room furniture when choosing artwork. A more formal dining room might call for classic paintings, while a modern dining room might benefit from abstract art.
Hallway
Hallways often present unique challenges due to their narrow dimensions. A gallery wall of smaller, related pieces can be a great way to add visual interest without overwhelming the space. Ensure there’s enough clearance to walk comfortably without bumping into the artwork.
Common Mistakes to Avoid
Even with these guidelines in mind, it’s easy to make mistakes when choosing art proportions. Here are some common pitfalls to avoid:
- Hanging Art Too High: This is perhaps the most common mistake. Art that’s hung too high feels disconnected from the rest of the room. Aim for eye-level placement.
- Choosing Art That’s Too Small: A tiny piece of art on a large wall can look lost and insignificant. Opt for artwork that’s appropriately sized for the space.
- Ignoring the Furniture: The artwork should complement the furniture beneath it. If you’re hanging art above a sofa, make sure it’s not wider than the sofa itself.
- Overcrowding the Walls: While gallery walls can be beautiful, it’s important to avoid overcrowding the space. Leave enough breathing room between the pieces and the surrounding walls.
- Not Considering the Room’s Style: The artwork should complement the overall style of the room. A modern piece might clash with a traditional setting, and vice versa.
Beyond the Rules: Trust Your Instincts
While these guidelines provide a solid foundation, don’t be afraid to break the rules and trust your own instincts. Ultimately, the best art proportion is the one that feels right to you. Experiment with different sizes and placements until you find a combination that resonates with your personal style and enhances the overall aesthetic of your space. After all, art is subjective, and the goal is to create a space that you love.
Tools and Techniques for Visualizing Art in Your Space
Unsure how a particular piece of art will look in your room? Fortunately, there are several tools and techniques you can use to visualize the final result. These range from low-tech solutions to advanced augmented reality apps.
Painter’s Tape Method
A simple and effective method is to use painter’s tape to mark out the dimensions of the artwork on the wall. This allows you to visualize the size and placement of the piece before committing to hanging it. You can experiment with different sizes and arrangements until you find the perfect fit.
Paper Cutouts
Similar to the painter’s tape method, you can create paper cutouts in the actual size of the prospective artwork. Tape these cutouts to the wall to get a sense of how the artwork will look in the space. This is especially useful for planning gallery walls, as you can easily rearrange the paper cutouts until you achieve the desired composition. This is a great kid friendly way to map out your design as well!
Augmented Reality (AR) Apps
Several apps use augmented reality to allow you to virtually hang artwork on your walls. These apps use your phone’s camera to overlay the artwork onto a live view of your room, giving you a realistic preview of how it will look. Some popular AR apps for art visualization include:
- Art.com: Offers a View in Room feature that allows you to see how different artworks will look in your space.
- Overstock: Provides an AR tool that lets you virtually place furniture and decor, including artwork, in your room.
- Houzz: Includes a View in My Room feature that allows you to visualize furniture and decor, including art, in your home.
These apps can be incredibly helpful for making informed decisions about art purchases and placement. Remember to consider lighting and viewing angles when using AR apps, as these factors can affect how the artwork appears in the virtual rendering.
Hanging Art Like a Pro: Essential Tips and Tricks
Once you’ve chosen the right art proportion and have a clear plan for placement, it’s time to hang your artwork. Here are some essential tips and tricks to ensure a professional-looking result:
Gather the Right Tools
Before you start, make sure you have the necessary tools on hand. This typically includes:
- Measuring tape: For accurate measurements of the wall and artwork.
- Level: To ensure the artwork is perfectly straight.
- Pencil: For marking the spot where you’ll hang the hardware.
- Hammer: For driving nails or picture hooks into the wall.
- Screwdriver: For installing screws if needed.
- Picture hanging hardware: Choose hardware that’s appropriate for the weight of the artwork and the type of wall (e.g., drywall, plaster, wood).
- Wall anchors: For heavier artwork, use wall anchors to provide extra support.
Protect Your Walls
When hammering nails or drilling screws into the wall, it’s important to protect the surrounding area from damage. Place a piece of painter’s tape over the spot where you’ll be hammering or drilling to prevent the paint from chipping. After hanging the art, consider adding felt pads to the bottom corners of the frame to prevent it from scratching the wall. [internal_link] These pads will also help to keep the artwork from shifting or sliding.
Double-Check Your Measurements
Before you start hammering or drilling, double-check all your measurements. Ensure that the artwork is centered and at the desired height. It’s always a good idea to have a second pair of eyes to confirm your measurements and alignment. This will help to prevent costly mistakes and ensure a professional-looking result.
The Final Flourish: Lighting and Presentation
The impact of your art doesn’t stop with proper proportion and careful hanging. How you light and present your artwork can elevate its beauty and create an even more engaging experience.
Strategic Lighting
Proper lighting can dramatically enhance the impact of your artwork. Consider adding track lighting or spotlights to highlight your favorite pieces. Position the lights to avoid glare or reflections, and experiment with different angles to find the most flattering illumination. For paintings, consider using picture lights that attach directly to the frame. These lights provide focused illumination without casting harsh shadows.
Framing Considerations
The frame you choose can significantly impact the overall presentation of your artwork. Select a frame that complements the style and colors of the artwork. Consider the size and thickness of the frame in relation to the artwork and the surrounding space. A well-chosen frame can enhance the artwork’s beauty and create a more polished and professional look.
Creating a Narrative
Think about how your artwork tells a story and how it relates to the rest of your decor. Arrange your art in a way that creates a visual narrative, drawing viewers’ eyes from one piece to another. Consider the placement of other decorative objects, such as vases or sculptures, to complement the artwork and create a cohesive and visually appealing display.
By mastering the art of placement and paying attention to details like lighting and presentation, you can transform your art collection into a stunning focal point that enhances the beauty and ambiance of your home.