The Art of Decorating Around a Piece of Art: A Comprehensive Guide
That striking canvas, the mesmerizing sculpture, the vintage tapestry – it’s more than just decoration; it’s a statement. But how do you build a room around a cherished piece of art without it feeling forced, cluttered, or worse, like a gallery instead of a home? Decorating around a piece of art is about creating a cohesive narrative, a visual conversation between the artwork and its surroundings. It’s about enhancing the art’s impact, not overshadowing it. This guide will provide you with the principles and practical steps to transform your space into a harmonious and artful sanctuary.
Understanding Your Artwork: The Foundation of Design
Before you even think about paint colors or furniture placement, you need to deeply understand the artwork itself. This isn’t just about admiring it; it’s about analyzing its core elements:
- Color Palette: What are the dominant colors? Are they warm or cool? Are there subtle undertones that you can pull out?
- Style and Medium: Is it abstract, representational, modern, classical, oil on canvas, watercolor, a photograph? The style will heavily influence the overall aesthetic of the room.
- Size and Scale: A small, delicate watercolor requires a different approach than a large, imposing oil painting.
- Mood and Emotion: What feelings does the artwork evoke? Is it calming, energetic, thought-provoking, or dramatic?
Once you have a solid grasp of these elements, you can begin to build your design concept.
Color: Creating Harmony and Contrast
Color is your most powerful tool when decorating around a piece of art. It can either amplify the artwork’s impact or create a jarring disconnect. Here’s how to wield it effectively:
Pulling Colors from the Artwork
This is the most common and often the most successful approach. Identify 2-3 key colors in the artwork and use them as the basis for your room’s color scheme. Don’t be afraid to use variations of these colors – lighter tints for walls, deeper shades for furniture, and accent colors for accessories.
Complementary Colors: A Bold Choice
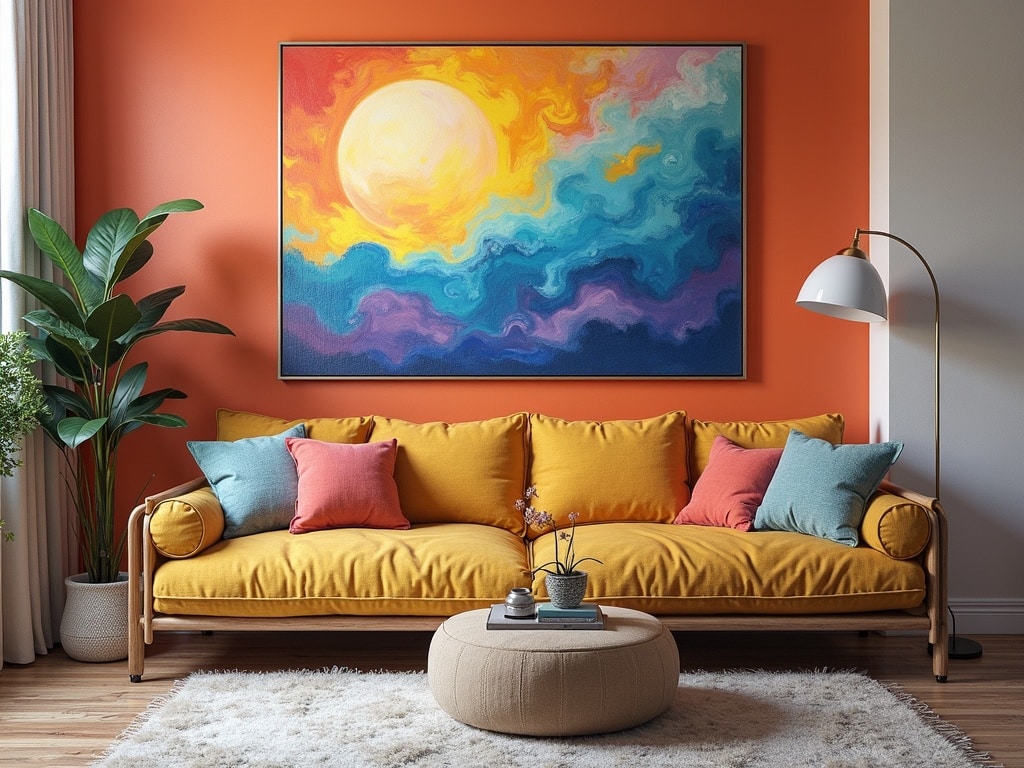
If you’re feeling adventurous, consider using complementary colors – those that sit opposite each other on the color wheel. For example, if your artwork features a lot of blue, you could use orange as an accent color. This creates a dynamic contrast but requires careful balancing to avoid overwhelming the artwork.
Neutral Backgrounds: Letting the Art Shine
A neutral background – white, gray, beige, or greige – is always a safe bet, especially if your artwork is very colorful or complex. This allows the art to take center stage without competing with its surroundings. Consider the undertones of the neutral – a warm-toned artwork will pair better with a warm-toned neutral.
Lighting: Illuminating the Masterpiece
Proper lighting is crucial for showcasing your artwork and creating the right ambiance in the room. Bad lighting can make even the most stunning piece look dull and lifeless.
Natural Light: The Best Option
Whenever possible, take advantage of natural light. Position your artwork near a window, but be mindful of direct sunlight, which can damage delicate pieces over time. Use sheer curtains or blinds to diffuse the light.
Artificial Lighting: Supplementing Natural Light
Use a combination of ambient, task, and accent lighting to create a well-lit and visually appealing space. Track lighting or individual spotlights are ideal for highlighting artwork. Make sure the color temperature of the light is appropriate for the artwork – warm light for warm-toned art, and cool light for cool-toned art. Consider LED bulbs with UV protection to prevent fading.
Furniture and Layout: Creating a Visual Dialogue
The furniture you choose and how you arrange it plays a vital role in creating a harmonious relationship between the artwork and its surroundings. [internal_link]The goal is to create a space that feels balanced, inviting, and visually engaging.
Scale and Proportion: Maintaining Balance
Ensure that the furniture is in proportion to the size of the artwork and the room. A large, imposing sofa might overwhelm a small, delicate watercolor. Conversely, dainty furniture might get lost next to a massive canvas. Consider the visual weight of the furniture – darker colors and heavier materials will appear more substantial than lighter colors and airy designs.
Creating Focal Points: Directing the Eye
The artwork should be the primary focal point of the room. Arrange the furniture to draw the eye towards it. Avoid placing tall or visually distracting objects directly in front of the artwork. Consider using a well-placed rug or a strategically positioned piece of furniture to frame the artwork and create a sense of visual depth.
The Art of Negative Space: Giving the Art Room to Breathe
Don’t overcrowd the space. Negative space – the empty areas around the artwork and furniture – is just as important as the objects themselves. It allows the eye to rest and appreciate the artwork without feeling overwhelmed. Avoid cluttering the walls around the artwork with too many other pieces. Sometimes, less is more.
Accessorizing: Adding the Finishing Touches
Accessories are the icing on the cake, the details that tie the whole room together. They should complement the artwork without competing with it.
Pillows and Throws: Adding Texture and Color
Use pillows and throws to introduce colors and textures that echo the artwork. Choose fabrics that complement the style of the art – velvet for a luxurious feel, linen for a more casual look, and silk for a touch of elegance. Consider patterns that subtly reference the artwork’s motifs or colors.
Vases, Sculptures, and Decorative Objects: Echoing the Art’s Theme
Choose accessories that complement the artwork’s style and subject matter. A minimalist sculpture might pair well with an abstract painting, while a collection of vintage vases could complement a landscape painting. Avoid using too many small, scattered accessories, which can create a cluttered and distracting look. Instead, opt for a few well-chosen pieces that make a statement.
Mirrors: Enhancing Light and Space
Mirrors can be used to reflect light and create the illusion of more space. Position a mirror opposite a window to amplify natural light or place it near the artwork to reflect its colors and patterns. Choose a frame that complements the style of the artwork and the room’s décor.
Hanging and Placement: The Ultimate Presentation
The height at which you hang your artwork can significantly impact its visual appeal. The general rule of thumb is to hang artwork so that the center is at eye level, typically around 57-60 inches from the floor.
Consider the Viewing Distance
For larger pieces, consider the viewing distance. You want to ensure that viewers can comfortably take in the entire artwork without straining their necks. In a living room, hang the artwork above the sofa, leaving enough space between the top of the sofa and the bottom of the artwork (typically 6-12 inches).
Creating a Gallery Wall: A Curated Collection
If you have multiple pieces of art that you want to display, consider creating a gallery wall. This is a great way to showcase a collection of artwork that shares a common theme, style, or color palette. Experiment with different layouts before you start hammering nails into the wall. You can use paper cutouts to represent the artwork and arrange them on the floor to find the perfect configuration. Maintain consistent spacing between the pieces to create a cohesive look.
Breaking the Rules: When to Deviate from the Norm
While these guidelines provide a solid foundation, don’t be afraid to break the rules and experiment with your own personal style. After all, the most important thing is to create a space that reflects your personality and makes you feel happy and inspired.
Mixing Styles: Creating Eclectic Charm
Don’t be afraid to mix different styles and eras. Pairing a modern painting with antique furniture can create a surprisingly harmonious and visually interesting look. The key is to find a common thread that ties the different elements together, such as a shared color palette or a similar level of formality.
Unexpected Placement: Challenging Conventions
Consider hanging your artwork in unexpected places, such as in a bathroom or a hallway. This can add a touch of personality and charm to often-overlooked spaces. Think outside the box and experiment with different ways to display your artwork. You could lean it against a wall, prop it up on a shelf, or even suspend it from the ceiling.
The Final Touches: Stepping Back and Evaluating
Once you’ve completed your decorating project, take a step back and evaluate the overall effect. Does the room feel balanced and harmonious? Does the artwork stand out without overpowering the space? Are you happy with the way everything has come together?
Living with Your Art: Adapting and Refining
Remember that decorating is an ongoing process. Don’t be afraid to make changes and adjustments as you live with your art and your décor. You might find that you want to rearrange the furniture, swap out the accessories, or even repaint the walls. The goal is to create a space that evolves with you and your personal style. Most importantly, have fun and enjoy the process of creating a beautiful and artful home.